I’ve been living in my 30+ year old mobile home over a year now with a shit-ton of renovations in process or still needing to be started… the life of a do-it-yourselfer. This is not a DIY blog, a million of those exist (I follow those with admiration and envy). This is a random stay at home mom blog, and I stress that I’m not trying to be a tutorial because I cut costs and corners wherever I can. If anything, I’m happy to inspire you to not be afraid to try something with no experience or budget, learn from my mistakes and be encouraged to know settling for “it looks like a noob made it” isn’t always a bad thing.
My kitchen cabinets make an “L” shape, with only one side having a countertop. The sink is balanced on furring strips and planks wrapped in waterproof material make up the “counters” on either side of it. As annoying as this arrangement is, the hassle of installing a countertop is a procrastination we’re still ok with. Need to cut an 8 foot pre-fabricated counter down to 7 feet, unhook the sink from the plumbing to measure the hole for it – then cut the hole in the countertop, level and install the cabinets themselves, install the countertop, then finally re-hook up the sink. That’s an all day job you can’t just do on a whim.
With the old trailer, I wasn’t willing to go all-out on cosmetics. So the kitchen backsplash needed to be both frugal and practical for me to do with a toddler underfoot. I’m not an Amazon affiliate (although I should be… I spend enough of my own money there…), but I’ll go ahead and name-drop. Through browsing and other DIY blogs I found Facade vinyl tin-look ceiling and wall tiles. Excited, I got 2 sheets of their cheapest-per-foot, white, traditional farmhouse print. I hung one above/behind the oven. I like the vinyl, I really do, but further reading made me discount it as the counter’s backsplash because I own a countertop basket fryer. That kind of close heat would hurt the vinyl. More Amazon browsing and reviews led me to Metal Ceiling Express, which has a thin, real tin version of the very same pattern Facade did in vinyl.
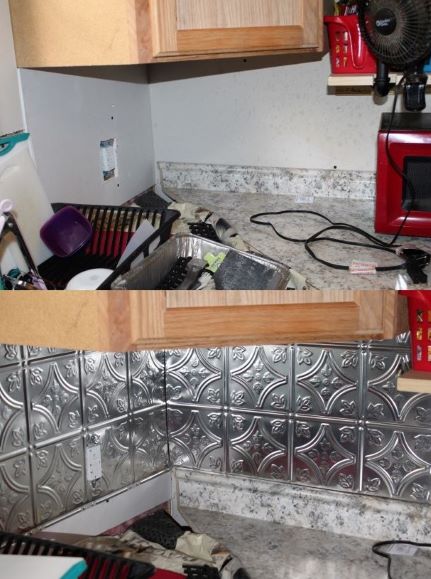
One of the best things about the ceiling tiles is I could go 2 feet at a time as my daughter stayed distracted, shuffling around the things in the way because I was still using the kitchen rather than clearing it all and trying to install in one go. This really wouldn’t take an experienced DIY-er much time at all. I’m on day 2 and still not done, but not discouraged.
I started by taping together big sheets of art paper to make stencils of the wall. I only cut then tacked in place one tin piece at a time before continuing, in case measurements and/or cuts wound up wonky. My pattern seams aren’t perfect (my mistake isn’t pictured), but my husband didn’t notice until I pointed it out. I took that as reason enough to pretend it didn’t bother me.
Tin snips were more than capable of the job, just had to wear gloves, nibble slowly, and be cautious of creating ripples. Since I sucked so bad at cutting holes for outlets into drywall (OMG, I had to buy jumbo outlet covers everywhere else), I took this opportunity to redeem myself – started small and crept larger as needed.
I still have 1 panel to cut into shape and hang, then will add finishing nails to truly anchor the tiles. Hubby thinks they’re too shiny, so I’ll have to research ways to artistically dull them up. Until I manage to dull them – if I even do (tint-able clear glaze for faux finishes exist, but I’m loath to spend more money) I can’t clear caulk corners and seams yet… but it is very encouraging progress on the whole renovation project. Need to use up construction materials stored in the back bedroom before I can fix up said bedroom for my daughters. Deadline to birth of #2 is creeping ever closer!
